Category Archives: Recipe

Recipe: Yellow Split Pea Soup

I’ve tried a few different split pea soups in my time, sometimes they are very tasty and other times not great. I’ve tried to make split pea soup myself a few times and have failed miserably with hard peas after a long cooking time. Long cooked, hard split peas are difficult to digest, highlighting the point that food needs to be cooked well to aid digestion. I looked through cookbooks, and various websites to finally learn that it is best to soak and cook the peas before adding them to the soup. In the pre cooking process, it is likely the peas turn into mostly yellow mush, so the soup turns out like it has been pureed.

Having more plant based foods is a healthy choice, so here is a quick and easy recipe for a flavourful yellow split pea soup:

1 cup yellow split peas, soaked overnight

1 onion, finely diced

1 carrot, finely diced

1 stalk celery, finely diced

1 jalapeno pepper (seeds removed), finely diced

1 tomato, finely chopped

1 small piece of ginger peeled

2 tablespoons coconut oil

4 cups vegetable broth

1 tsp curry powder

salt and pepper to taste

1 lime, juiced

In a small pot, bring soaked and rinsed split peas to a boil in 1.5 cups of water, simmer until the desired tenderness is reached.

In a large pot, heat coconut oil and lightly sauté onions, celery, carrot and jalapeño until tender, then add chopped tomato. Season with a little salt. Add cooked split peas and a bit more salt. Add vegetable broth, curry powder and ginger, bring to a light boil and simmer for 15-20 minutes. Stir in lime juice and season to taste. Enjoy topped with some chopped cilantro

Recipe: Gluten Free Apple Muffins

My family went apple picking and I benefitted from the fruits on their labour. I asked for mutsu/crispin apples since that is the apple chef Doug Penfold uses for the most amazing apple tart ever at Chabrol. With these hand picked apples, I’ve been making some very delicious gluten free apple muffins. I find gluten free baked goods do not keep very well, so this recipe makes only 6-7 muffins. Enough to enjoy warm or kept until the next day.

1/4 cup chickpea flour

1/4 cup millet flour

1/4 cup brown rice flour

1/2 tsp baking soda

1/2 tsp baking powder

3/4 tsp xantham gum

Dash of cinnamon, cardamom, allspice, nutmeg and salt

1/4 cup sugar

1 egg

1/4 cup melted butter

1/2 cup sour cream

2 small apples or 1 large apple diced

Preheat oven to 375 degrees

In a small flour, mix together flours, baking powder, baking soda, xantham gum, spices and salt.

In a medium bowl, whisk together egg with sugar then whisk in melted butter and sour cream until well combined.

Add dry ingredients to the medium bowl with mixed wet ingredients. Stir until just combined. Stir in most of the diced apple.

Spoon batter evenly into 6-7 muffin tins either lined or greased. Press a few of the remaining apple chunks onto the tops of the muffins. Bake for 20-25min or until golden brown

Enjoy warm or at room temp within a day or so.

Recipe: Banana chocolate chip walnut bites

I love sweet treats and sugar. I may the only fitness and wellness professional to publicly share this feeling. There is a spectrum of healthy sweet treats and indulgences. I have been working with some gluten free banana bread recipes lately and decided to make these coconut flour bites in a silicone mini muffin mold. There is a much higher likelihood of success in gluten free baking if smaller pans are used. I have enjoyed these little treats that are low in sugar and high on taste as a bit of fuel on the go to keep me going between meals.

3 very ripe bananas, mashed

2 eggs

2-3 tablespoons melted coconut oil

1 tablespoon or less honey or to taste

1/2 cup coconut flour

2 tablespoons dark chocolate chips

2 tablespoons chopped walnuts

Preheat oven to 350 degrees. In a medium bowl, whisk together bananas, eggs, coconut oil and honey. Add coconut flour. Stir together with a wooden spoon just until blended. Stir in chocolate chips and walnuts. Spoon batter into mini muffin mold. Bake approximately 20 min or until tops are slightly brown. Cool and enjoy. Keeps in an airtight container for a few days refrigerated.

Recipe: Creamy Hummus

Hummus is a great healthy snack to have on hand at anytime. Being so busy balancing school and work, I had to set a goal to prepare food for myself, otherwise it is a diet of too much pizza and other takeout. Hummus is really helpful to have on hand as a satisfying small meal.

Hummus can easily be purchased at any grocery store, however, homemade from scratch is so much better. The key is cooking the chickpeas yourself, which delivers superior taste and texture. I have no idea how to make tahini, so I buy jars of tahini. I have no attachment to organic tahini, I use both types. In my experience so far, the tahini that is made from imported ingredients and sold in ethnic shops makes for a smoother hummus.

Here is the original recipe that inspired me to write and share another hummus recipe:
https://www.bonappetit.com/recipe/creamy-hummus-with-cumin

Creamy Hummus

For Chickpeas: 1 cup dry chickpeas (soaked overnight in water with 1 tsp baking soda)

2 cloves garlic, jalapeno(whole with top cut off), bay leaf, 1 sprig rosemary(optional)

After chickpeas have been soaked overnight, rinse in a strainer and place chickpeas into a pot with water covering by about 2 inches. Add garlic, jalapeño, bay and rosemary. Bring water and chickpeas to a boil and reduce heat to a simmer until chickpeas are soft, 30-45 min. Discard garlic, jalapeño, bay leaf, and rosemary. Drain and rinse chickpeas, reserve 1 cup of cooking liquid.

For Hummus:

1 clove garlic, slivered

Juice of 1-2 lemons and 1 lime

1/2 cup tahini

Cooked chickpeas(approx 2.5-3 cups)

1 tsp ground cumin

1 tsp sea salt

Place lemon juice and garlic in food processor and allow garlic to sit in the lemon/lime juice for about 5 min to soften the bite of the raw garlic. Add tahini to lemon juice and garlic, 1/2 of the salt, process until smooth. Add chickpeas, cumin and remaining salt, process until smooth, stopping to scrape sides of the bowl as needed. Check that the texture of the hummus is smooth and creamy. If it seems thick, add a little cooking liquid to improve texture. Adjust salt and or lemon juice to taste, enjoy with crackers, vegetables, in a sandwich or in a bowl as a sauce garnish. Hummus will keep in the fridge for up to a week. This hummus also freezes well.


Recipe: Banana Chia Pudding

This summer my good friend K offered me a chia pudding cup. I never got around to eating it, so I asked her what it was made with and she said banana. The next time I came across some ripe bananas, I figured I would make my own banana chia pudding. I had full fat coconut milk on hand, so I mashed the banana, added coconut milk and Coconut Dream to make my chia pudding. I swirled in some strawberry jam as sweetener and found a tasty snack, or breakfast or alternative to yogurt. Chia seeds also have the added benefit of aiding digestion by moving through the intestines. I prefer whole chia seeds. However, this week, I showed a client how to make this pudding and found she had only ground chia seeds, so we made pudding with just banana and added coconut water as liquid with a touch of cinnamon plus maple syrup to sweeten. Quite pleasant tasting…

I am not going to include a photo of either forms of pudding as they actually look a bit like barf. Think of chia pudding as an alternative to yogurt or a tasty medicinal digestive aid, so give it a try. This is so easy to make that I will suggest you create your own recipe to suit your tastes:

3 tablespoons whole white chia seeds

1/2-1 whole mashed ripe banana

1/4-1/2 cup coconut milk (from a can)-optional

1/4-1/2 cup non dairy milk of your choice or juice or coconut water

Mash banana in a medium bowl, stir in chia seeds, add liquid to create a pudding like consistency. Refrigerate for an hour or overnight, When ready to serve, stir again and add more liquid for desired consistency. Sweeten with jam, maple syrup or honey. Top with granola, nuts or fruit and enjoy,

Recipe: Shortcakes for summer

I have loved strawberry shortcake since childhood. There are differing versions, spongecake layers versus biscuit like shortcake. I have taken a liking to the simplicity of the biscuit form of strawberry shortcake as a delicious summer treat that happens to be low in sugar. I feel it is best to make your own whipped cream with organic whipping cream. Here are two recipes I make regularly with ease and great results. The first recipe was first seen in the the Globe and Mail from Lucy Waverman many years ago. The second recipe is gluten free adapted from the Coconut Diet Cookbook.

Simple shortcakes

1 1/2 cups all purpose flour

1 tablespoon sugar, plus a little extra for sprinkling if desired

2 teaspoons baking powder

1/2 teaspoon salt

1 cup whipping cream

Preheat oven to 400F. Combine flour, sugar, baking powder and salt in a medium bowl, mix well. Add whipping cream and stir together with a spoon just until the mixture resembles a ball of dough.

Shape dough into a ball with your hands and press into a disc on a lightly floured surface, flatten to 1/4 inch thickness.

Use a round cutter of your choice (2-3inches) and cut dough into rounds, placing onto a baking sheet. Gather scraps of dough and cut until finished. Brush with tops of the rounds with the dregs of whipping cream and sprinkle with a touch of sugar if desired.

Bake for 20-22 minutes or until tops are golden. Let cool slightly, slice in half and top with whipped cream and strawberries, enjoy!

Makes 4-6 shortcakes depending on the size of cutter you use.


Coconut Shortcakes (gluten free)


1/3 cup melted coconut oil

6 eggs

1/4 cup coconut sugar

1/2 teaspoon salt

1/2 teaspoon vanilla

1/2 cup coconut flour

1/2 teaspoon baking soda


Preheat oven to 400F. In a medium bowl, whisk together coconut oil, eggs, sugar, salt and vanilla. Add coconut flour, mix together with a spoon until a batter forms. Pour into muffin tin or silicon baking cups filling just over halfway. Bake for 15 minutes or until golden brown. Cool 10-15 minutes before slicing in half, serving with whipped cream and strawberries.


Recipe: Roasted Squash soup

I had some roasted squash soup as a special at Foxley in the fall. It was so delicious, I set out to make some myself the very next day. The recipe has taken some practice and I did ask chef Tom Thai for tips-the key is to rest the squash after it was roasted. The kaffir lime leaves and lemongrass impart such a nice balance with the rich coconut milk above the delicious roasted squash base.

1 buttercup squash

1 butternut squash

1 apple, peeled, cored and diced

1 onion, chopped

2 tablespoons coconut oil

handful of kaffir lime leaves

1 stalk of lemongrass, cut into pieces

4-6 cups vegetable stock

1 can full fat coconut milk

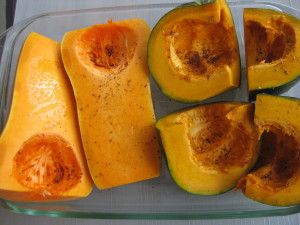
butternut and buttercup squash ready for roasting-2 types add depth of flavour

butternut and buttercup squash ready for roasting-2 types add depth of flavour

Wash the squash in warm water thoroughly. Usually squash are hard to cut through, so I throw them in the oven for 10-15 minutes whole to soften. Preheat oven to 350 degrees (soften up the squash as well).

Cut squash in half, scoop out seeds and rub with a little coconut or olive oil. Roast squash in a baking dish for 45-60 minutes. Leave in oven to ‘rest’ for a couple hours or until cool.

Depending on the softness of the squash, you can scoop out the flesh in chunks or peel the skin and cut into chunks.

In a large pot, heat coconut oil over medium heat and saute the onion and apple until softened. Add the squash, vegetable broth, lime leaves, and lemongrass. Bring to a boil and reduce heat to a simmer for 30 minutes. Remove the lime leaves and lemongrass. Puree with an immersion blender. Season with salt and stir in coconut milk until blended. Enjoy!

Salad meals…we make our own

I have always wondered how a person could eat a salad for lunch or dinner, as it has always been an unsatisfying meal for me. I have ordered salads from all sorts of restaurants and specialized ‘healthy’ food places to feel disappointment in having a salad as a light lunch, never mind as dinner. A UK trainer friend shared the nutrition and healthy lifestyle tip of learning how to make your favourite food very well as a way of motivating yourself to cook. In my case of having a salad for a meal, the idea always sounded good, but it never worked until I started making lunch salads myself.

After a year of getting into the habit of having salads for lunch on a regular basis, I maintain it is best that you make your own to suit your own tastes, nutritional and digestive needs.  Salads are a great way to enjoy raw foods, in other words, natural, whole foods with the only processing being chopping. Selection of the raw foods makes a difference in digestion and energy levels when you pay attention, as every person is different. Here are some salads I have found be  satisfying meals:
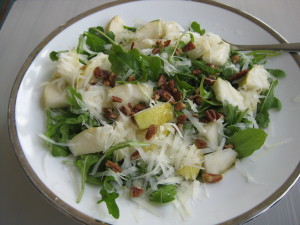
pear arugula salad

Arugula and pear salad

Arugula pear salad with honey, shaved cheese and pecans: The combination of sweet, tart pear with the bite and slight bitterness of arugula is a classic combination. Dress the arugula leaves with a drizzle of olive oil, salt and pepper. Then top with sliced pear, a squeeze of lemon, a drizzle of honey then shaved grana padano cheese and pecans.
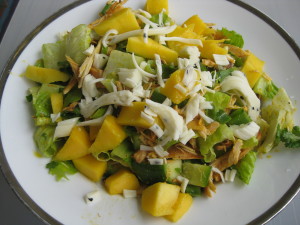
mixed green salad with slow cooked chicken, avocado, mango, cilantro and lime

mixed green salad with slow cooked chicken, avocado, mango, cilantro, lime and a sprinkling of string cheese

Mixed green salad with slow cooked chicken and mango: This salad is a fusion of several sources of inspiration. I ate the most delicious Mexican taco salad with slow cooked chicken at the San Francisco airport this year and I came home and wanted to make my own slow cooked chicken right away. Chili infused macadamia oil is a discovery I made in Hawaii a few years ago then mixed together with cilantro and lime from a farmer’s market for a most delicious, fresh salad dressing. This salad of chopped romaine and any other mixed greens on hand, is topped with green onion, sugar snap peas, cucumber, avocado, cilantro. Dressed with salt, pepper, a drizzle of chili infused macadamia oil, a generous squeeze of fresh lime juice, tossed and topped with slow cooked chicken, fresh mango pieces and a sprinkling of string cheese (just happened to have it on hand from a Lebanese store).
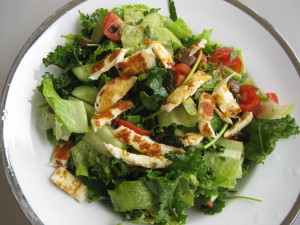
Greek salad with grilled halloumi

Greek salad with grilled halloumi

‘Greek’ salad topped with grilled halloumi cheese:

A Greek friend explained to me years ago that a greek salad is dressed with olive oil, lemon juice and oregano. I have taken creative liberty with this concept and my greek salad consists of romaine lettuce (other greens if available), green onion, cucumber, cherry tomato, chopped olives, fresh mint, parsley and oregano, seasoned with salt and pepper, drizzled with olive oil, a generous squeeze of fresh lemon juice, tossed and served with grilled halloumi cheese.

I hope the salads I mention above look appealing and inspire you to create your own. What the salads have in common is a slightly longer list of fresh ingredients with flavour and the technique of salting the salad greens first (a key step in bringing out the flavour of the greens), drizzling with oil then citrus juice. Also works the same way with any other type of dressing. The possibilities in making your own salad combinations are unlimited in your choice of greens, other veggies or fruit, protein sources, flavourful  toppings like fresh herbs, cheese, olives, crunchy toppings like nuts or seeds. Enjoy!


A Taste of Morocco: Orange, date and mint

On a recent trip to Morocco, I noticed that there was an abundance of oranges. Seville orange trees, fantastic fresh orange juice at breakfast, and offerings of sliced orange topped with cinnamon as a dessert option (which I did not order, as pastries beckoned). Dates were also widely available in many varieties. Mint tea was a beverage of choice for refreshment of the palate and to aid digestion. Orange, date and mint, tastes of Morocco.

Looking through recipes when I came home, one that immediately appealed to me was a date and orange salad in Plenty More, and of course it was almost featured in an episode on Morocco. I made my own version of the salad with sugar snap peas, orange, dates and mint, which was tasty, but I felt I would prefer the orange, date and mint on its own…possibly as a healthy dessert

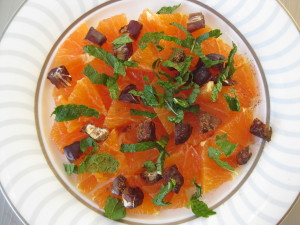
I really enjoyed the pure flavour combination of fresh orange, chopped dates, fresh mint and a dash of cinnamon as a refreshingly delicious dessert. Here are the preparation guidelines for a single serving (multiply as needed for additional servings)

One orange

1-2 dates, chopped

5-6 fresh mint leaves

dash of cinnamon

IMG_3940


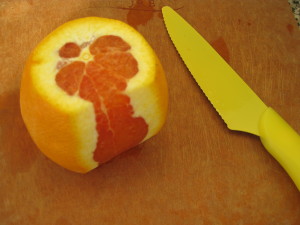
Slice the top and bottom off the orange, then remove the skin following the curve of the orange. Slice orange across the segments and arrange on a plate. Top with chopped dates, sprinkle cinnamon to taste, then top with chopped fresh mint, and enjoy.

IMG_3942


Recipe: Chickpea pancakes

I have never been a fan of savoury breakfasts. However, the January issue of Bon Appetit magazine was full of various healthy eating ideas and one recipe that caught my interest was squash, leek, and chickpea pancakes. I made them this week and loved them! They remind me of one of my favourite Chinese appetizers, green onion pancakes, but healthier, since these pancakes are made with chickpea flour and also contain veggies. Having made them with both carrots and squash, I must say I prefer the taste and texture of the carrot pancake. Plus, I am curious to try this recipe as a sweet carrot pancake…(shallot and salt need to be omitted for that experiment)

3/4 cup chickpea flour

1/2 cup water

1 egg

1/4 tsp baking powder

1 tablespoon olive oil

salt to taste

1 cup grated squash or carrot

1 shallot finely chopped

salt and pepper to taste

plain yogurt and chopped parsley for serving

In a medium bowl, stir together chickpea flour and water, whisk in egg, olive oil, baking powder and salt. Let batter stand, as you cook the veggies.

In a oiled skillet over medium heat, saute shallots and squash until cooked through, about 2-4 minutes. Season with salt and pepper.

Stir cooked squash and shallot into chickpea batter (can be refrigerated overnight). Batter should have a thin, pourable consistency, add water if necessary.

Heat an oiled skillet (same one as above) over medium heat. Spoon 1/4 cupfuls of batter into skillet. Cook until bubbles form in the pancakes, flip and cook until browned. Repeat until batter is finished, about 6-8 pancakes. Serve immediately topped with yogurt and chopped parsley. If you have any leftover pancakes, they can be refrigerated and heated up in the toaster (homemade toaster pancakes!)


chickpea pancake topped with yogurt and parsley

chickpea pancake topped with yogurt and parsley