Category Archives: plant food

Recipe: Creamy Hummus

Hummus is a great healthy snack to have on hand at anytime. Being so busy balancing school and work, I had to set a goal to prepare food for myself, otherwise it is a diet of too much pizza and other takeout. Hummus is really helpful to have on hand as a satisfying small meal.

Hummus can easily be purchased at any grocery store, however, homemade from scratch is so much better. The key is cooking the chickpeas yourself, which delivers superior taste and texture. I have no idea how to make tahini, so I buy jars of tahini. I have no attachment to organic tahini, I use both types. In my experience so far, the tahini that is made from imported ingredients and sold in ethnic shops makes for a smoother hummus.

Here is the original recipe that inspired me to write and share another hummus recipe:
https://www.bonappetit.com/recipe/creamy-hummus-with-cumin

Creamy Hummus

For Chickpeas: 1 cup dry chickpeas (soaked overnight in water with 1 tsp baking soda)

2 cloves garlic, jalapeno(whole with top cut off), bay leaf, 1 sprig rosemary(optional)

After chickpeas have been soaked overnight, rinse in a strainer and place chickpeas into a pot with water covering by about 2 inches. Add garlic, jalapeño, bay and rosemary. Bring water and chickpeas to a boil and reduce heat to a simmer until chickpeas are soft, 30-45 min. Discard garlic, jalapeño, bay leaf, and rosemary. Drain and rinse chickpeas, reserve 1 cup of cooking liquid.

For Hummus:

1 clove garlic, slivered

Juice of 1-2 lemons and 1 lime

1/2 cup tahini

Cooked chickpeas(approx 2.5-3 cups)

1 tsp ground cumin

1 tsp sea salt

Place lemon juice and garlic in food processor and allow garlic to sit in the lemon/lime juice for about 5 min to soften the bite of the raw garlic. Add tahini to lemon juice and garlic, 1/2 of the salt, process until smooth. Add chickpeas, cumin and remaining salt, process until smooth, stopping to scrape sides of the bowl as needed. Check that the texture of the hummus is smooth and creamy. If it seems thick, add a little cooking liquid to improve texture. Adjust salt and or lemon juice to taste, enjoy with crackers, vegetables, in a sandwich or in a bowl as a sauce garnish. Hummus will keep in the fridge for up to a week. This hummus also freezes well.



Recipe: Carrot, mint and date salad

My trip to Morocco was a unique experience in terms of culture and food. I will never forget the meals that came with many plates of salads, one of which was carrot salad. I am not a fan of raw carrots at all. However, once cooked and seasoned, I like carrots enough. This salad is inspired by the salads I had in Morocco and more recently by the opening of my friends’ restaurant Atlas.

5-6 carrots, peeled and sliced thick

1 tablespoon olive oil

sprinkle of cumin to taste

juice of 1/2 to 1 lemon

honey to taste

handful of chopped fresh mint

5-6 pitted dates, chopped

Bring salted water to boil in a medium pot. Add carrots and boil for 6 minutes or until desired tenderness. Drain.

In a medium bowl, whisk together lemon juice, olive oil, honey and cumin. Add cooked carrots and dates, toss together gently and top with mint. Enjoy slightly warm or at room temperature

Recipe: Banana Chia Pudding

This summer my good friend K offered me a chia pudding cup. I never got around to eating it, so I asked her what it was made with and she said banana. The next time I came across some ripe bananas, I figured I would make my own banana chia pudding. I had full fat coconut milk on hand, so I mashed the banana, added coconut milk and Coconut Dream to make my chia pudding. I swirled in some strawberry jam as sweetener and found a tasty snack, or breakfast or alternative to yogurt. Chia seeds also have the added benefit of aiding digestion by moving through the intestines. I prefer whole chia seeds. However, this week, I showed a client how to make this pudding and found she had only ground chia seeds, so we made pudding with just banana and added coconut water as liquid with a touch of cinnamon plus maple syrup to sweeten. Quite pleasant tasting…

I am not going to include a photo of either forms of pudding as they actually look a bit like barf. Think of chia pudding as an alternative to yogurt or a tasty medicinal digestive aid, so give it a try. This is so easy to make that I will suggest you create your own recipe to suit your tastes:

3 tablespoons whole white chia seeds

1/2-1 whole mashed ripe banana

1/4-1/2 cup coconut milk (from a can)-optional

1/4-1/2 cup non dairy milk of your choice or juice or coconut water

Mash banana in a medium bowl, stir in chia seeds, add liquid to create a pudding like consistency. Refrigerate for an hour or overnight, When ready to serve, stir again and add more liquid for desired consistency. Sweeten with jam, maple syrup or honey. Top with granola, nuts or fruit and enjoy,

Recipe: Roasted Squash soup

I had some roasted squash soup as a special at Foxley in the fall. It was so delicious, I set out to make some myself the very next day. The recipe has taken some practice and I did ask chef Tom Thai for tips-the key is to rest the squash after it was roasted. The kaffir lime leaves and lemongrass impart such a nice balance with the rich coconut milk above the delicious roasted squash base.

1 buttercup squash

1 butternut squash

1 apple, peeled, cored and diced

1 onion, chopped

2 tablespoons coconut oil

handful of kaffir lime leaves

1 stalk of lemongrass, cut into pieces

4-6 cups vegetable stock

1 can full fat coconut milk

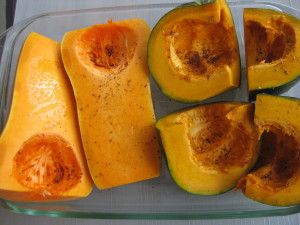
butternut and buttercup squash ready for roasting-2 types add depth of flavour

butternut and buttercup squash ready for roasting-2 types add depth of flavour

Wash the squash in warm water thoroughly. Usually squash are hard to cut through, so I throw them in the oven for 10-15 minutes whole to soften. Preheat oven to 350 degrees (soften up the squash as well).

Cut squash in half, scoop out seeds and rub with a little coconut or olive oil. Roast squash in a baking dish for 45-60 minutes. Leave in oven to ‘rest’ for a couple hours or until cool.

Depending on the softness of the squash, you can scoop out the flesh in chunks or peel the skin and cut into chunks.

In a large pot, heat coconut oil over medium heat and saute the onion and apple until softened. Add the squash, vegetable broth, lime leaves, and lemongrass. Bring to a boil and reduce heat to a simmer for 30 minutes. Remove the lime leaves and lemongrass. Puree with an immersion blender. Season with salt and stir in coconut milk until blended. Enjoy!

Cook beans from dry, skip the cans

Beans were a food I feared for a long time for their gaseous properties. On many occasions when I did eat them, they did not sit well in my stomach. Over the past few years in exploring more plant based foods, I got into the habit of cooking beans myself, because I found the texture to be much better and the beans were much easier to digest when I cooked them myself. In addition, I save the use of a can in doing my small part for the earth for much improved taste and texture- Making Life Good definitely recommends cooking your own beans!

Cooking dry beans is easy. The only skill required is ability to observe boiling water. The first step is to purchase dry beans of your choice from a retailer that sells a good volume of beans, since beans with their long shelf life can get old and less pleasant to eat. Once you have brought your beans home, take 1-2 cups of dry beans and soak in a large bowl of water overnight.

Rinse the soaked beans in a strainer. Place beans in a large pot, cover with an ample amount of water, say 2 inches or so. Bring to a boil for 2-5 minutes, lower to a simmer and cook until beans are the desired tenderness. You can save the bean cooking liquid to add flavour to soups if you wish. Strain the beans and rinse with water if desired. Your beans are now ready to be added to any soup, stew, chili, salad or any other recipe to enjoy.

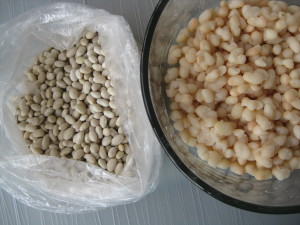
dry white beans before soaking and cooking then ready to eat after with just a little work

dry white beans before soaking and cooking then ready to eat after with just a little work


Recipe: Chickpea pancakes

I have never been a fan of savoury breakfasts. However, the January issue of Bon Appetit magazine was full of various healthy eating ideas and one recipe that caught my interest was squash, leek, and chickpea pancakes. I made them this week and loved them! They remind me of one of my favourite Chinese appetizers, green onion pancakes, but healthier, since these pancakes are made with chickpea flour and also contain veggies. Having made them with both carrots and squash, I must say I prefer the taste and texture of the carrot pancake. Plus, I am curious to try this recipe as a sweet carrot pancake…(shallot and salt need to be omitted for that experiment)

3/4 cup chickpea flour

1/2 cup water

1 egg

1/4 tsp baking powder

1 tablespoon olive oil

salt to taste

1 cup grated squash or carrot

1 shallot finely chopped

salt and pepper to taste

plain yogurt and chopped parsley for serving

In a medium bowl, stir together chickpea flour and water, whisk in egg, olive oil, baking powder and salt. Let batter stand, as you cook the veggies.

In a oiled skillet over medium heat, saute shallots and squash until cooked through, about 2-4 minutes. Season with salt and pepper.

Stir cooked squash and shallot into chickpea batter (can be refrigerated overnight). Batter should have a thin, pourable consistency, add water if necessary.

Heat an oiled skillet (same one as above) over medium heat. Spoon 1/4 cupfuls of batter into skillet. Cook until bubbles form in the pancakes, flip and cook until browned. Repeat until batter is finished, about 6-8 pancakes. Serve immediately topped with yogurt and chopped parsley. If you have any leftover pancakes, they can be refrigerated and heated up in the toaster (homemade toaster pancakes!)


chickpea pancake topped with yogurt and parsley

chickpea pancake topped with yogurt and parsley

Recipe: Dandelion Greens with Lemon

I developed a surprise liking for dandelion greens last summer in Italy. I ordered the sauteed greens on the menu at a pizzeria, and a plate of greenish grey cooked leafy greens arrived on a plate smothered in olive oil. The unappealing looks were deceiving, as what appeared to be overcooked greens were absolutely delicious. I looked through the leafy greens available at the grocery store and determined I had eaten cicoria, Italian dandelion. I bought the cicoria and tried to lightly saute them with garlic and was not able to replicate the deliciousness I had at the local pizzeria.

I was reluctant to try dandelion greens at home, as they looked a bit different, and I got over my reservations. I also learned that they need to be lightly boiled in salted water to mellow the bitter flavour. Squeezing the cooked greens removes excess water and allows for a better saute. Dandelion greens can be delicious without overcooking, the secret is to be generous with the olive oil and lemon. In addition to being delicious, dandelion greens are a source of vitamins A, C and K, iron and calcium.

Recipe:

1 bunch dandelion greens, cut into 1 inch pieces

1 clove of garlic, sliced

Olive oil to your taste, probably a minimum of one tablespoon

salt and pepper to taste

lemon juice to taste

In a large pot, bring salted water to a boil. Add dandelion greens and return to a boil for a minute or two. Rinse with cool water in a colander. Once greens are cool, squeeze excess water with your hands.

In a medium pan, heat olive oil over medium heat. Add garlic and cook until it starts to brown slightly. Add dandelion greens and cook until warmed through and thoroughly coated with olive oil. Season with salt, pepper and lemon juice to taste. Enjoy warm or at room temperature.

Recipe: Roasted Sweet Potato with Lemon Maple Dressing

Sweet potatoes are supposedly a ‘good’ carbohydrate with a lower glycemic index that most nutrition people will say is a healthy choice. However, I have never liked sweet potatoes very much as a carbohydrate choice on my plate, even as fries, as I generally do not find them to be satisfying. I have experienced some looks of incredulity amongst health conscious eaters when I announce I don’t really like sweet potatoes. I am changing my tune with this recipe I discovered  and made repeatedly the past 3 weeks. I was going to bring this dish for a potluck and it was so delicious I had to keep it for myself!!! This recipe caught my eye in the Ottolenghi cookbook and it is a form of sweet potato I will gladly eat anytime. I believe what converted me was the incredible blend of tastes and textures created with the maple syrup, lemon, sherry vinegar, raisins, chili, parsley, cilantro and pecans that elevate the sweet potato.

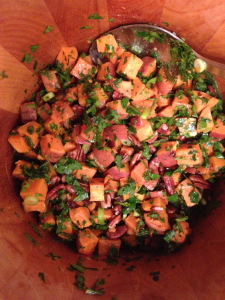
The tastiest sweet potatoes, with lemon maple dressing, parsley, cilantro, raisins and pecans

The tastiest sweet potatoes, with lemon maple dressing, parsley, cilantro, raisins and pecans

Roasted Sweet Potato with Lemon Maple Dressing

2-3 sweet potatoes, diced, leave the skin on

Olive oil, salt and pepper to taste

For dressing:

3 tablespoons olive oil

Juice of 1-2 lemons

1 tablespoon sherry vinegar

2 tablespoons maple syrup

1/2 tsp cinnamon

1/2 tsp ground ginger

‘Garnish’:

2 green onions, chopped

3 tablespoons chopped parsley

2 tablespoons chopped cilantro

1/4 tsp chili flakes

1/4 cup golden raisins

1/4 cup chopped pecans, toasted


Preheat oven to 350 degrees. In a rimmed baking dish, toss diced sweet potatoes with a little olive oil, salt and pepper. Mix well with your hands. Roast sweet potatoes in the oven for approximately 30 min, stirring halfway through to ensure even cooking. Remove from heat before the potatoes become too soft, they require some bite to them to hold up to the dressing.

In a small bowl, whisk together lemon juice, maple syrup, sherry vinegar, cinnamon, ginger and olive oil. Adjust taste to your liking, as it is best a little tangy. Set aside.

Place chopped green onion in a large bowl. Add the roasted sweet potatoes while they are still hot, and mix well with dressing. Stir in chopped parsley, cilantro, chili flakes, raisins and pecans. Enjoy warm or at room temperature at a later time.


Recipe: Party Hummus by the Naked Label

Hummus is a snack I like to enjoy occasionally. There are many opinions on what needs to go into hummus to make it great. I posted a highly purist version without tahini a couple years ago. It took me a while to get to this recipe, as I have tested and absorbed so many hummus recipes over the years. I met the creator of this amazing hummus recipe, Briana Santoro by chance in Antigua early this year. She is a nutrition expert who has compiled a great cookbook Get Naked in The Kitchen with nutrition education, healthy recipes  and most importantly the book has my endorsement for great taste! Briana’s video here and others on her site are fun and highly educational:

http://thenakedlabel.com/blog/2014/03/24/best-hummus-recipe/

I watched this video a while ago and finally got around to making the hummus from memory today. It is so delicious I had to write this up right away and call it party hummus! Briana shares some secret ingredients in the video above. This is my version, hopefully I recalled her secret ingredients correctly (watch her video to know for sure) and I’ll add my chickpea and hummus strategies .

I stock only dry beans in my kitchen, as canned beans seem to give me digestive issues, and beans you cook yourself have better taste and texture. Chickpeas can be a bit tricky sometimes to get the right tenderness without losing the skins. Soaking overnight with baking soda really improves the cooking time and texture of chickpeas. In addition, the technique of blending the tahini with lemon juice first makes an extra smooth hummus in my experience.

Party Hummus from theNakedLabel.com

Soak 1 cup of dry chickpeas in a large bowl of water and 1 tsp of baking soda overnight or for 8 hours plus.

Rinse chickpeas, place in a large pot, and cover with plenty of water. Bring to a boil and reduce heat to a simmer. Cook chickpeas until tender, 20-60 minutes or more, depending on your chickpeas. Rinse chickpeas, set aside.

3 tablespoons tahini

juice of one lemon

juice of one orange

1-2 cloves garlic, chopped

3 cups cooked chickpeas

1 tablespoon olive oil

1-2 tablespoons tamari

cumin and paprika to taste

salt and pepper to taste

In a food processor, blend together tahini with orange and lemon juice. Add garlic, chickpeas, olive oil and tamari process until smooth. Season with cumin, paprika, salt and pepper, process until combined. Adjust seasoning to your taste, enjoy the hummus with crackers, veggies, or anything else you like for yourself or a party!


Recipe: Chickpea Salad (sandwich)

The Oh She Glows cookbook by Angela Liddon and blog www.ohsheglows.com recently came to my attention through my sister. I found the vegan recipes to be inspiring, so I ordered the cookbook, then made some oatmeal cookies from the blog the next day. I have enjoyed the cookbook so far and particularly liked a recipe for chickpea salad. I must admit that I used regular mayonnaise. However, you can purchase vegan mayonnaise at the health food store or make your own with a blender and Angela Liddon’s recipe in the cookbook.

Here is my version of the Oh She Glows chickpea salad. A delicious vegetarian alternative for a classic ‘salad’ sandwich. I much prefer home cooked chickpeas. The Old Bay seasoning really adds a great flavour.

2-3 cups cooked chickpeas (canned is alright if you wish)

2 stalks celery, diced

2 green onions, chopped

2-3 tablespoons mayonnaise (vegan if you prefer)

1 tablespoon chopped fresh dill (optional, but tasty)

Old Bay seasoning, lemon juice, salt and pepper to taste

In a medium bowl, mash chickpeas with a fork until half are mashed and half are still whole. Add celery, green onion and mayonnaise to the chickpeas, mix well. Season with dill, Old Bay seasoning, lemon juice, salt and pepper to your taste. Enjoy as a sandwich or over a bed of greens as a salad.

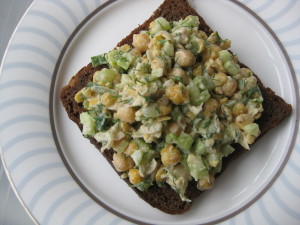
Delicious chickpea salad on rye toast

Delicious chickpea salad on rye toast