Category Archives: Healthy food

Cook beans from dry, skip the cans

Beans were a food I feared for a long time for their gaseous properties. On many occasions when I did eat them, they did not sit well in my stomach. Over the past few years in exploring more plant based foods, I got into the habit of cooking beans myself, because I found the texture to be much better and the beans were much easier to digest when I cooked them myself. In addition, I save the use of a can in doing my small part for the earth for much improved taste and texture- Making Life Good definitely recommends cooking your own beans!

Cooking dry beans is easy. The only skill required is ability to observe boiling water. The first step is to purchase dry beans of your choice from a retailer that sells a good volume of beans, since beans with their long shelf life can get old and less pleasant to eat. Once you have brought your beans home, take 1-2 cups of dry beans and soak in a large bowl of water overnight.

Rinse the soaked beans in a strainer. Place beans in a large pot, cover with an ample amount of water, say 2 inches or so. Bring to a boil for 2-5 minutes, lower to a simmer and cook until beans are the desired tenderness. You can save the bean cooking liquid to add flavour to soups if you wish. Strain the beans and rinse with water if desired. Your beans are now ready to be added to any soup, stew, chili, salad or any other recipe to enjoy.

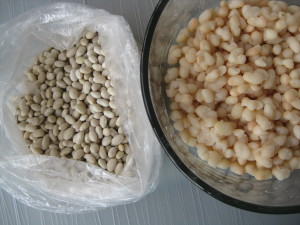
dry white beans before soaking and cooking then ready to eat after with just a little work

dry white beans before soaking and cooking then ready to eat after with just a little work


Recipe: Chickpea pancakes

I have never been a fan of savoury breakfasts. However, the January issue of Bon Appetit magazine was full of various healthy eating ideas and one recipe that caught my interest was squash, leek, and chickpea pancakes. I made them this week and loved them! They remind me of one of my favourite Chinese appetizers, green onion pancakes, but healthier, since these pancakes are made with chickpea flour and also contain veggies. Having made them with both carrots and squash, I must say I prefer the taste and texture of the carrot pancake. Plus, I am curious to try this recipe as a sweet carrot pancake…(shallot and salt need to be omitted for that experiment)

3/4 cup chickpea flour

1/2 cup water

1 egg

1/4 tsp baking powder

1 tablespoon olive oil

salt to taste

1 cup grated squash or carrot

1 shallot finely chopped

salt and pepper to taste

plain yogurt and chopped parsley for serving

In a medium bowl, stir together chickpea flour and water, whisk in egg, olive oil, baking powder and salt. Let batter stand, as you cook the veggies.

In a oiled skillet over medium heat, saute shallots and squash until cooked through, about 2-4 minutes. Season with salt and pepper.

Stir cooked squash and shallot into chickpea batter (can be refrigerated overnight). Batter should have a thin, pourable consistency, add water if necessary.

Heat an oiled skillet (same one as above) over medium heat. Spoon 1/4 cupfuls of batter into skillet. Cook until bubbles form in the pancakes, flip and cook until browned. Repeat until batter is finished, about 6-8 pancakes. Serve immediately topped with yogurt and chopped parsley. If you have any leftover pancakes, they can be refrigerated and heated up in the toaster (homemade toaster pancakes!)


chickpea pancake topped with yogurt and parsley

chickpea pancake topped with yogurt and parsley

Recipe: Dandelion Greens with Lemon

I developed a surprise liking for dandelion greens last summer in Italy. I ordered the sauteed greens on the menu at a pizzeria, and a plate of greenish grey cooked leafy greens arrived on a plate smothered in olive oil. The unappealing looks were deceiving, as what appeared to be overcooked greens were absolutely delicious. I looked through the leafy greens available at the grocery store and determined I had eaten cicoria, Italian dandelion. I bought the cicoria and tried to lightly saute them with garlic and was not able to replicate the deliciousness I had at the local pizzeria.

I was reluctant to try dandelion greens at home, as they looked a bit different, and I got over my reservations. I also learned that they need to be lightly boiled in salted water to mellow the bitter flavour. Squeezing the cooked greens removes excess water and allows for a better saute. Dandelion greens can be delicious without overcooking, the secret is to be generous with the olive oil and lemon. In addition to being delicious, dandelion greens are a source of vitamins A, C and K, iron and calcium.

Recipe:

1 bunch dandelion greens, cut into 1 inch pieces

1 clove of garlic, sliced

Olive oil to your taste, probably a minimum of one tablespoon

salt and pepper to taste

lemon juice to taste

In a large pot, bring salted water to a boil. Add dandelion greens and return to a boil for a minute or two. Rinse with cool water in a colander. Once greens are cool, squeeze excess water with your hands.

In a medium pan, heat olive oil over medium heat. Add garlic and cook until it starts to brown slightly. Add dandelion greens and cook until warmed through and thoroughly coated with olive oil. Season with salt, pepper and lemon juice to taste. Enjoy warm or at room temperature.

Recipe: Roasted Sweet Potato with Lemon Maple Dressing

Sweet potatoes are supposedly a ‘good’ carbohydrate with a lower glycemic index that most nutrition people will say is a healthy choice. However, I have never liked sweet potatoes very much as a carbohydrate choice on my plate, even as fries, as I generally do not find them to be satisfying. I have experienced some looks of incredulity amongst health conscious eaters when I announce I don’t really like sweet potatoes. I am changing my tune with this recipe I discovered  and made repeatedly the past 3 weeks. I was going to bring this dish for a potluck and it was so delicious I had to keep it for myself!!! This recipe caught my eye in the Ottolenghi cookbook and it is a form of sweet potato I will gladly eat anytime. I believe what converted me was the incredible blend of tastes and textures created with the maple syrup, lemon, sherry vinegar, raisins, chili, parsley, cilantro and pecans that elevate the sweet potato.

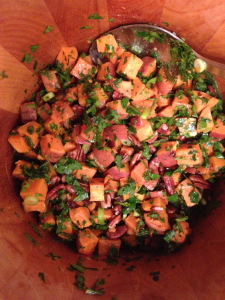
The tastiest sweet potatoes, with lemon maple dressing, parsley, cilantro, raisins and pecans

The tastiest sweet potatoes, with lemon maple dressing, parsley, cilantro, raisins and pecans

Roasted Sweet Potato with Lemon Maple Dressing

2-3 sweet potatoes, diced, leave the skin on

Olive oil, salt and pepper to taste

For dressing:

3 tablespoons olive oil

Juice of 1-2 lemons

1 tablespoon sherry vinegar

2 tablespoons maple syrup

1/2 tsp cinnamon

1/2 tsp ground ginger

‘Garnish’:

2 green onions, chopped

3 tablespoons chopped parsley

2 tablespoons chopped cilantro

1/4 tsp chili flakes

1/4 cup golden raisins

1/4 cup chopped pecans, toasted


Preheat oven to 350 degrees. In a rimmed baking dish, toss diced sweet potatoes with a little olive oil, salt and pepper. Mix well with your hands. Roast sweet potatoes in the oven for approximately 30 min, stirring halfway through to ensure even cooking. Remove from heat before the potatoes become too soft, they require some bite to them to hold up to the dressing.

In a small bowl, whisk together lemon juice, maple syrup, sherry vinegar, cinnamon, ginger and olive oil. Adjust taste to your liking, as it is best a little tangy. Set aside.

Place chopped green onion in a large bowl. Add the roasted sweet potatoes while they are still hot, and mix well with dressing. Stir in chopped parsley, cilantro, chili flakes, raisins and pecans. Enjoy warm or at room temperature at a later time.


Recipe: Party Hummus by the Naked Label

Hummus is a snack I like to enjoy occasionally. There are many opinions on what needs to go into hummus to make it great. I posted a highly purist version without tahini a couple years ago. It took me a while to get to this recipe, as I have tested and absorbed so many hummus recipes over the years. I met the creator of this amazing hummus recipe, Briana Santoro by chance in Antigua early this year. She is a nutrition expert who has compiled a great cookbook Get Naked in The Kitchen with nutrition education, healthy recipes  and most importantly the book has my endorsement for great taste! Briana’s video here and others on her site are fun and highly educational:

http://thenakedlabel.com/blog/2014/03/24/best-hummus-recipe/

I watched this video a while ago and finally got around to making the hummus from memory today. It is so delicious I had to write this up right away and call it party hummus! Briana shares some secret ingredients in the video above. This is my version, hopefully I recalled her secret ingredients correctly (watch her video to know for sure) and I’ll add my chickpea and hummus strategies .

I stock only dry beans in my kitchen, as canned beans seem to give me digestive issues, and beans you cook yourself have better taste and texture. Chickpeas can be a bit tricky sometimes to get the right tenderness without losing the skins. Soaking overnight with baking soda really improves the cooking time and texture of chickpeas. In addition, the technique of blending the tahini with lemon juice first makes an extra smooth hummus in my experience.

Party Hummus from theNakedLabel.com

Soak 1 cup of dry chickpeas in a large bowl of water and 1 tsp of baking soda overnight or for 8 hours plus.

Rinse chickpeas, place in a large pot, and cover with plenty of water. Bring to a boil and reduce heat to a simmer. Cook chickpeas until tender, 20-60 minutes or more, depending on your chickpeas. Rinse chickpeas, set aside.

3 tablespoons tahini

juice of one lemon

juice of one orange

1-2 cloves garlic, chopped

3 cups cooked chickpeas

1 tablespoon olive oil

1-2 tablespoons tamari

cumin and paprika to taste

salt and pepper to taste

In a food processor, blend together tahini with orange and lemon juice. Add garlic, chickpeas, olive oil and tamari process until smooth. Season with cumin, paprika, salt and pepper, process until combined. Adjust seasoning to your taste, enjoy the hummus with crackers, veggies, or anything else you like for yourself or a party!


Silicon mini muffin mold for gluten free treats!

Gluten free is a food trend that seems to be staying with us. Avoiding ‘farinaceous’ foods for weight control has been suggested for many years, dating back to 1825 in the book, Physiology of Taste. I work with lots of people that choose to eat gluten free to improve health issues they experience. However, I love traditional baked goods and I can only consume gluten free foods I really enjoy, since I do not have celiac disease. This leaves me with the job of locating and creating gluten free foods that I can enjoy and share with you here.

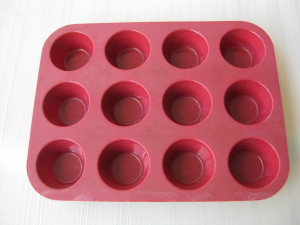
I have been aggravated and disappointed on quite a few occasions while adapting a recipe with alternative flours. The biggest issue is a crumbly texture with a recent most frustrating incident of ricotta pancakes falling apart while I flipped them! I had already conveniently added too much sugar, so I pressed the remainder of the batter into my silicon mini muffin mold:


magic silicon mini muffin mold!

magic silicon mini muffin mold!

The ricotta and coconut flour batter for pancakes was baked into mini cheesecakes. They were tasty in a healthy sort of way and a lot more appealing than a crumbled pancake!

Coconut macaroons usually are a gluten free option. I tried a vegan version that was quite crumbly, barely held together and was very difficult to create any shape with. Again, the silicon muffin mold came to the rescue for a perfectly formed and browned coconut macaroon! The key is the mold is non stick and allows you to press an otherwise slightly crumbly mixture into a pleasing shape that holds together once baked. This tool may help enhance the success of a recipe you may want to adapt into a gluten free version. My recommendation is to try recipes that have less than one cup of flour to start.

Here is an easy recipe for coconut macaroons that are easy to put together and quite delicious:

2 1/2 cups of unsweetened, shredded coconut

1/2-2/3 cup of sugar

1-2 eggs, beaten

1 tsp vanilla extract or grated lemon zest

pinch of salt

Preheat over to 350 degrees. In a medium bowl, whisk egg, sugar, vanilla extract and salt. Add shredded coconut and mix well with your hands. Spoon and press coconut mixture into the silicon mini muffin mold to the top of each cup. Bake for 10-12 minutes or desired brownness. Cool and enjoy! Store in an airtight container for up to 3 days.


Recipe: Chia Pudding

I have tried a few chia pudding recipes and found them to be lacking in the taste department and wondered how the name pudding could be applied to the recipes. While in London, my great friend K bought me a coconut chia pudding from Le Pain Quotidien despite my reluctance. This pudding was delicious!! We looked up the recipe and I tested it as soon as I returned home. There are only 2 ingredients to work with to your liking, canned coconut milk and chia seeds. Coconut milk contains healthy medium chain fatty acids and omega-3 fatty acids are found in chia seeds. In addition, this pudding feels like a dessert without any added sugar.

For one serving (use a ratio of 1 part chia seeds to 4 parts coconut milk to make your desired quantity)

1 tablespoon chia seeds

4-5 tablespoons canned coconut milk (full fat tastes best)

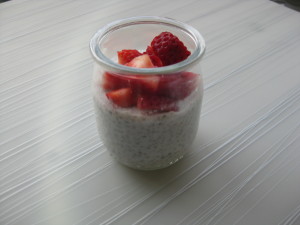
In a small bowl, stir together chia seeds and coconut milk. Refrigerate overnight or for at least an hour. Stir, add water if needed, for desired consistency. Top with chopped strawberries, shredded coconut, fruit of your choice, or passion fruit butter for an ultimate rich taste. Enjoy for breakfast, as a snack or dessert.

IMG_3856

Recipe: Banana Oatmeal Cookies (vegan)

In light of declaring love for the Cookie Monster, I must share this new discovery for a vegan oatmeal cookie (Cookie Monster’s second favourite cookie after chocolate chip). These cookies are made with unprocessed, whole foods and are delicious enough to feed the cookie monster inside any one of us. Oats are naturally a gluten free food, but may come into contact with gluten during processing. Purchase gluten free oats (they are more expensive) if you have that degree of sensitivity. I tend to have Bob’s organic rolled oats in my kitchen most of the time.

I ordered the Oh She Glows cookbook on the based on the inspiring appeal of this oatmeal cookie recipe http://ohsheglows.com/2014/01/17/banana-bread-muffin-tops/. I made them right away, repeated the tasty success several times over, so here is my adaptation of the recipe:

3 ripe bananas

1/2 cup pitted dates, packed (soak dry dates, and a mixture of medjool and other pitted dates is nice)

1/4 cup coconut oil

2 cups rolled oats, separated into 1.5 and 0.5 cups

1 tablespoon shredded coconut

1 tsp baking powder

1/4 tsp salt

1 tsp cinnamon

1/2 tsp nutmeg (optional, freshly grated is best)

1/4 cup currants

Preheat oven to 350 degrees. In a food processor, mix together dates, bananas, and coconut oil to a fairly smooth consistency. Add 1.5 cups of oats, shredded coconut, baking powder, salt, cinnamon, nutmeg, pulse until oats are ground. Power off food processor and remove the blade. Stir in remaining 0.5 cups of oats and currants into the bowl of the food processor.  Spoon batter onto a baking sheet and flatten slightly with a spatula. Bake for 12 minutes, remove and rotate tray, bake for 12 more minutes or until the desired level of browning is achieved. Makes 12-16 cookies.

Enjoy fresh or within 2-3 days or freeze for a week in an airtight container.

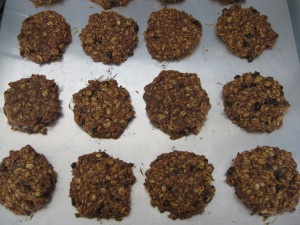
Enjoy vegan banana oatmeal cookies warm off the baking sheet!

Enjoy vegan banana oatmeal cookies warm off the baking sheet to indulge your cookie monster-


Recipe: Chickpea Salad (sandwich)

The Oh She Glows cookbook by Angela Liddon and blog www.ohsheglows.com recently came to my attention through my sister. I found the vegan recipes to be inspiring, so I ordered the cookbook, then made some oatmeal cookies from the blog the next day. I have enjoyed the cookbook so far and particularly liked a recipe for chickpea salad. I must admit that I used regular mayonnaise. However, you can purchase vegan mayonnaise at the health food store or make your own with a blender and Angela Liddon’s recipe in the cookbook.

Here is my version of the Oh She Glows chickpea salad. A delicious vegetarian alternative for a classic ‘salad’ sandwich. I much prefer home cooked chickpeas. The Old Bay seasoning really adds a great flavour.

2-3 cups cooked chickpeas (canned is alright if you wish)

2 stalks celery, diced

2 green onions, chopped

2-3 tablespoons mayonnaise (vegan if you prefer)

1 tablespoon chopped fresh dill (optional, but tasty)

Old Bay seasoning, lemon juice, salt and pepper to taste

In a medium bowl, mash chickpeas with a fork until half are mashed and half are still whole. Add celery, green onion and mayonnaise to the chickpeas, mix well. Season with dill, Old Bay seasoning, lemon juice, salt and pepper to your taste. Enjoy as a sandwich or over a bed of greens as a salad.

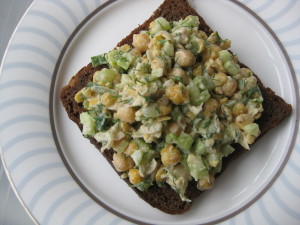
Delicious chickpea salad on rye toast

Delicious chickpea salad on rye toast


Greens at breakfast, lunch and dinner

Eating greens at breakfast, lunch and dinner is dietary advice I recently discussed at an all inclusive resort in Jamaica.  I believe that having the intent to put greens on your plate at breakfast, lunch and dinner helps to create the lifelong healthy habit of eating greens daily. I will admit that having greens for breakfast is not a daily habit I have, however, I have eggs and greens whenever I can. Callaloo and eggs are one of my favourites.

Eggs and callaloo with plaintain

Eggs and callaloo with plaintain

I have noticed that lots  of people do not like greens, and my suggestion is to keep trying until you find some green vegetables you like to eat. There are so many green vegetables to choose from that there must be some that you will like. Try to see eating greens as a culinary adventure-Making Life Good recommends to try a green vegetable you have not eaten in the past week, every week.